There’s something about roasted butternut squash that feels like home. It’s warm, slightly sweet, and full of flavor. Whether you’re making a cozy fall dinner or prepping veggies for the week, roasted butternut squash is always a winner.
But here’s the thing: if you don’t roast it right, you can end up with mushy or undercooked squash. No one wants that, right?
This step-by-step guide will walk you through how to roast butternut squash perfectly every single time. We’ll cover peeling, cutting, seasoning, and the all-important roasting technique.
Why You’ll Love Roasted Butternut Squash
Before we dive into the steps, let’s talk about why roasted butternut squash deserves a spot in your weekly rotation.
- Versatile – Serve it as a side, toss it in salads, add it to grain bowls, or blend into soups.
- Healthy – Packed with vitamins A and C, fiber, and antioxidants.
- Tasty – Roasting brings out its natural sweetness and gives it a slightly caramelized edge.
- Meal-prep friendly – Make a big batch and use it in recipes throughout the week.
Let’s break it down so you can start roasting like a pro.
Ingredients You’ll Need
- 1 medium butternut squash (about 2–3 lbs)
- 1–2 tablespoons olive oil
- ½ teaspoon salt (or to taste)
- Black pepper, to taste (optional)
- Optional seasonings: garlic powder, paprika, cinnamon, rosemary, or thyme
That’s it! Simple, clean ingredients that bring out the natural flavor of the squash.
How to Peel and Cut Butternut Squash (Without Going Crazy)
If you’ve ever tried wrangling a whole raw butternut squash, you know it can be a bit tricky at first. The skin is tough, and it’s shaped like a bowling pin. But don’t worry—I’ve got a strategy that works every time.
- Cut off both ends. This creates a stable base so it won’t wobble.
- Peel with a sharp vegetable peeler. Go from top to bottom, removing all the thick, beige skin until you see the deep orange flesh.
- Slice it in half lengthwise. Be careful! Use a sturdy knife and keep your fingers out of the way.
- Scoop out the seeds. A spoon works perfectly for this.
- Cut into cubes. Aim for ¾ to 1-inch cubes. Try to keep them all about the same size so they cook evenly.
Pro Tip: If peeling raw squash intimidates you, pop it in the microwave for 2–3 minutes first. This softens the skin slightly and makes it easier to peel.
How to Roast Butternut Squash
Alright, your squash is peeled, seeded, and chopped. Now comes the fun part—roasting!
Step-by-Step Roasting Instructions
- Preheat your oven to 425°F (220°C). You want a hot oven for those crispy, caramelized edges.
- Grab a large baking sheet. Line it with parchment paper for easy cleanup.
- Spread out your cubes. Make sure the squash is in a single layer and not stacked. Overcrowding will steam the squash instead of roasting it.
- Drizzle with olive oil. Use just enough to lightly coat all the pieces.
- Season generously. Salt and pepper are a must, but you can get creative with your favorite spices too.
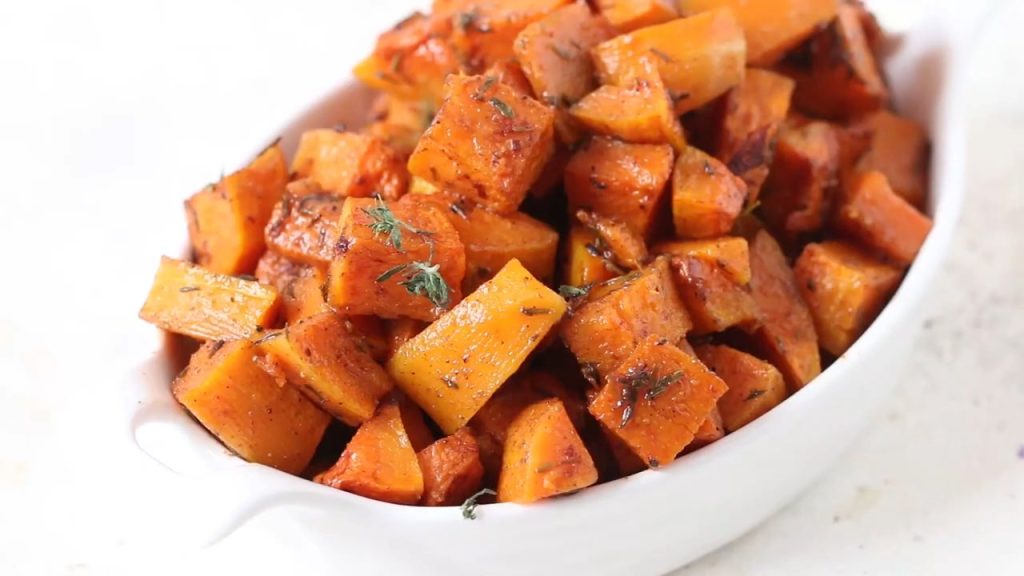
- Roast for 25–30 minutes. Flip halfway through to get golden edges on all sides. They should be tender and slightly browned when done.
And that’s it! Pull them out of the oven, give them a taste, and try not to eat the whole tray before dinner.
Delicious Flavor Combos to Try
Butternut squash is great on its own, but if you want to spice things up, here are some flavor combos you can’t go wrong with:
- Sweet & Spicy: Cinnamon, cayenne pepper, and a drizzle of maple syrup
- Herb & Garlic: Rosemary, thyme, and garlic powder
- Warm & Earthy: Smoked paprika, cumin, and black pepper
Don’t be afraid to experiment—your taste buds will thank you.
How to Store and Reheat Roasted Butternut Squash
One of the best things about roasted veggies? They store beautifully.
- In the fridge: Store in an airtight container for up to 4–5 days.
- In the freezer: Freeze for up to 3 months. Just spread on a baking sheet first to freeze individually before transferring to a bag.
To reheat: Toss on a baking sheet and warm in the oven at 375°F for about 10–12 minutes. This keeps them from getting soggy.
Fun Ways to Use Leftover Roasted Butternut Squash
If you’re a meal prepper like me, you’ll love how versatile leftover squash can be. Here are a few ways to use it:
- In a salad: Toss with arugula, goat cheese, and toasted pecans.
- In soup: Blend with veggie broth, garlic, and onion for a creamy, warming soup.
- In tacos or burritos: Swap it in as your veggie base.
- In Buddha bowls: Pile it on with quinoa, roasted chickpeas, and tahini sauce.
Frequently Asked Questions
Does butternut squash need to be peeled before roasting?
It depends on how you’re roasting it. If you’re roasting halves, you can leave the skin on and scoop it out later. But if you’re cubing it like in this recipe, it’s best to peel it first.
Why isn’t my roasted squash crispy?
If your squash turns out mushy or soggy, it’s often because the oven wasn’t hot enough or the pan was overcrowded. High heat and space between pieces are key to getting that golden caramelization.
Can I roast frozen butternut squash?
Yes—but keep in mind that frozen squash has more moisture. Roast at a high temp and don’t overcrowd the pan. You may not get as much crisp, but it’ll still taste great!
Final Thoughts
Learning how to roast butternut squash might seem tricky at first, but once you try it, you’ll see how easy (and delicious) it can be. With just a little prep and the right oven temp, you’ll have golden, tender squash every time.
So next time you’re at the store, grab a butternut squash and give this a go. Your dinners, salads, and soups are about to get a serious flavor upgrade. Trust me—once you start roasting your own veggies, there’s no going back to the frozen aisle!
Got a favorite seasoning combo? Let me know in the comments—I’d love to try it!