Have you ever bitten into a perfectly crispy, golden potato that melts like butter in your mouth? If not, you’re missing out on one of the most irresistible ways to prepare this humble vegetable. Introducing: melting potatoes—a simple side dish that sounds fancy but is surprisingly easy to make at home.
Whether you’re planning a weeknight dinner or hosting a holiday feast, these buttery, crisp-edged potatoes are always a hit. Stick around and I’ll show you exactly how to make melting potatoes that are tender on the inside, golden on the outside, and full of rich, savory flavor.
What Are Melting Potatoes?
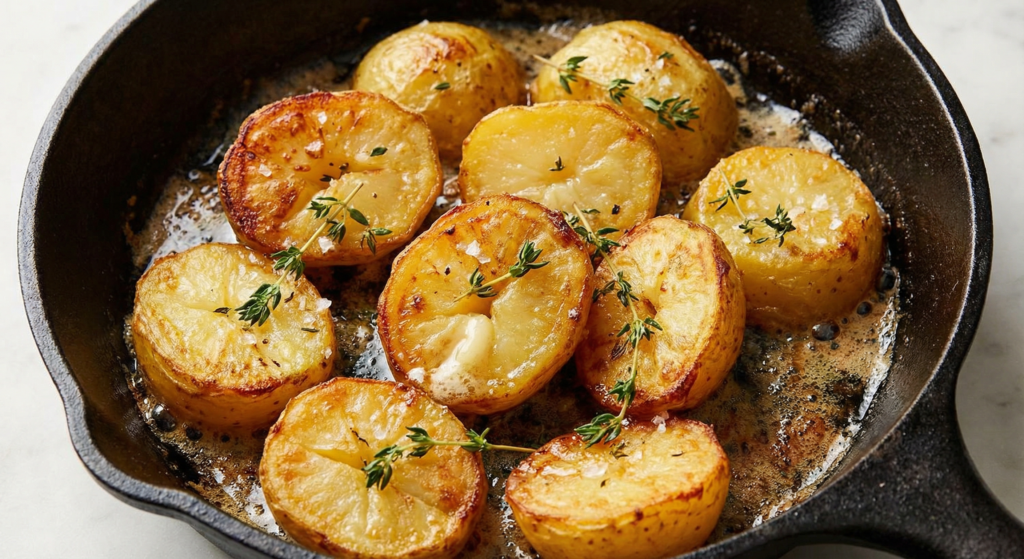
Let’s start with the basics. Melting potatoes are a cross between roasted potatoes and a creamy gratin. They’re sliced thick, seared in the oven for a crispy crust, and then baked in a flavorful broth that gives them that “melt-in-your-mouth” texture.
Think of them as the potato version of a good steak: crispy sear on the outside, juicy and tender on the inside. Sounds delicious, right?
Why You’ll Love Melting Potatoes
Still on the fence? Here’s why these buttery spuds deserve a spot on your plate:
- Perfectly crisp and creamy: Get the best of both worlds in every bite.
- Easy to make: No fancy equipment, just an oven and a baking dish.
- Versatile side dish: Pairs well with chicken, steak, fish, or even a veggie dinner.
- Great for entertaining: They look fancy but are low-effort.
Ingredients You’ll Need
You only need a handful of pantry staples to make these melt-in-your-mouth potatoes:
- Yukon Gold potatoes: Their buttery flavor and smooth texture are ideal.
- Butter: For richness that soaks into every bite.
- Olive oil: Helps get that crispy, golden edge.
- Garlic: Adds aromatic flavor to the broth.
- Chicken broth (or veggie broth): The secret to that soft, creamy interior.
- Salt and black pepper: Simple seasonings go a long way here.
- Fresh herbs (optional): Think rosemary, thyme, or parsley for a flavor boost.
How to Make Melting Potatoes Step-by-Step
Step 1: Slice the Potatoes
Start by peeling your Yukon Gold potatoes and slicing them into thick rounds—about 1 inch is just right. Too thin and they fall apart. Too thick and they won’t cook evenly.
Step 2: Sear in the Oven
Place the potato slices in a greased baking dish or sheet pan. Drizzle with a mixture of olive oil and melted butter. Sprinkle with salt and pepper. Bake at 450°F for about 15 minutes, then flip each round and roast for another 15 minutes. This is where that golden crispy edge starts forming.
Step 3: Add Broth and Garlic
Now comes the magic. Pour garlic-infused chicken broth over the potatoes. As they cook, the potatoes soak up all the flavor—and that’s what gives them their melting texture.
Step 4: Finish Roasting
Pop the dish back into the oven and let it roast for another 15-20 minutes, until the broth has mostly evaporated and the potatoes are fork-tender.
Step 5: Garnish and Serve
Sprinkle with fresh herbs and a bit more melted butter if you like (because let’s be honest—more butter is always better). Serve hot, straight from the oven, and watch them disappear faster than you can say “seconds, please!”
Tips for the Best Melting Potatoes
Want to take your potatoes to the next level? Keep these tips in mind:
- Use Yukon Golds for best results: They hold their shape and soak up flavor like a sponge.
- Don’t skip the broth: That final step is what makes them “melting” potatoes!
- Flip halfway through roasting: This gives each side that delicious crust.
- Use fresh garlic: While powdered garlic works in a pinch, fresh gives more depth and aroma.
- Add herbs for flavor and presentation: A sprinkle of parsley or rosemary makes a big difference.
Serving Ideas: What Goes With Melting Potatoes?
If you’re wondering what to serve with melting potatoes, the good news is—they go with just about everything! Here are some of our favorite pairings:
- Grilled or roasted meats: Chicken thighs, pork chops, or even a juicy steak are perfect matches.
- Seafood: Think baked salmon or sautéed shrimp.
- Vegetarian entrees: A hearty lentil loaf or stuffed peppers balance out the richness.
- Holiday ham or turkey: These potatoes are fancy enough for your holiday table.
Make-Ahead and Storage Tips
Hosting dinner? You’ll be happy to know these potatoes can be made in advance!
- Make ahead: You can roast the potatoes ahead of time and store them in the fridge for up to 2 days. Reheat in the oven before serving for the best texture.
- Store leftovers: Keep leftover potatoes in an airtight container in the fridge for up to 4 days.
- Reheat: Bake at 375°F for 10-15 minutes or until hot throughout and crispy on the edges again.
Final Thoughts: Why Melting Potatoes Should Be Your New Go-To Side Dish
There’s something magical about melting potatoes. With just a few ingredients and minimal effort, you end up with a side dish that’s rich, comforting, and downright impressive. They’re perfect for weeknight meals, family gatherings, Sunday dinners, or just when you want your potatoes to be anything but boring.
Next time you’re wondering what to make with those potatoes sitting in your pantry, try this recipe. I promise—it’ll become a favorite in your kitchen.
Have You Tried Melting Potatoes Yet?
If you give this recipe a try, let us know how it turned out! Did you add your own twist? Maybe some cheese or a splash of white wine in the broth? There are endless ways to make it your own.
Happy cooking, potato lovers!
Keywords: melting potatoes, how to make melting potatoes, buttery potatoes, crisp roasted potatoes, easy potato side dish, Yukon Gold potatoes recipe, crisp and creamy potatoes